Git 基本原理介绍
参考来自 Git 基本原理介绍 | Escape
学习 笔记
参考来自 我的 Git 学习笔记 | Escape
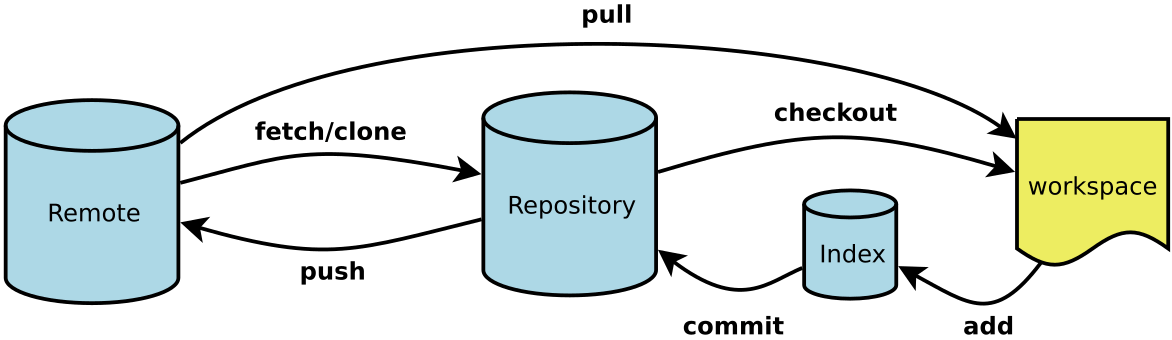
| 编号 | 专用名词 | 对应解释 | 相关命令 |
|---|---|---|---|
| 1 | Workspace | 工作区 | add |
| 2 | Index/Stage | 暂存区 | commit |
| 3 | Repository | 本地仓库 | push、checkout |
| 4 | Remote | 远程仓库 | fetch、clone、pull |
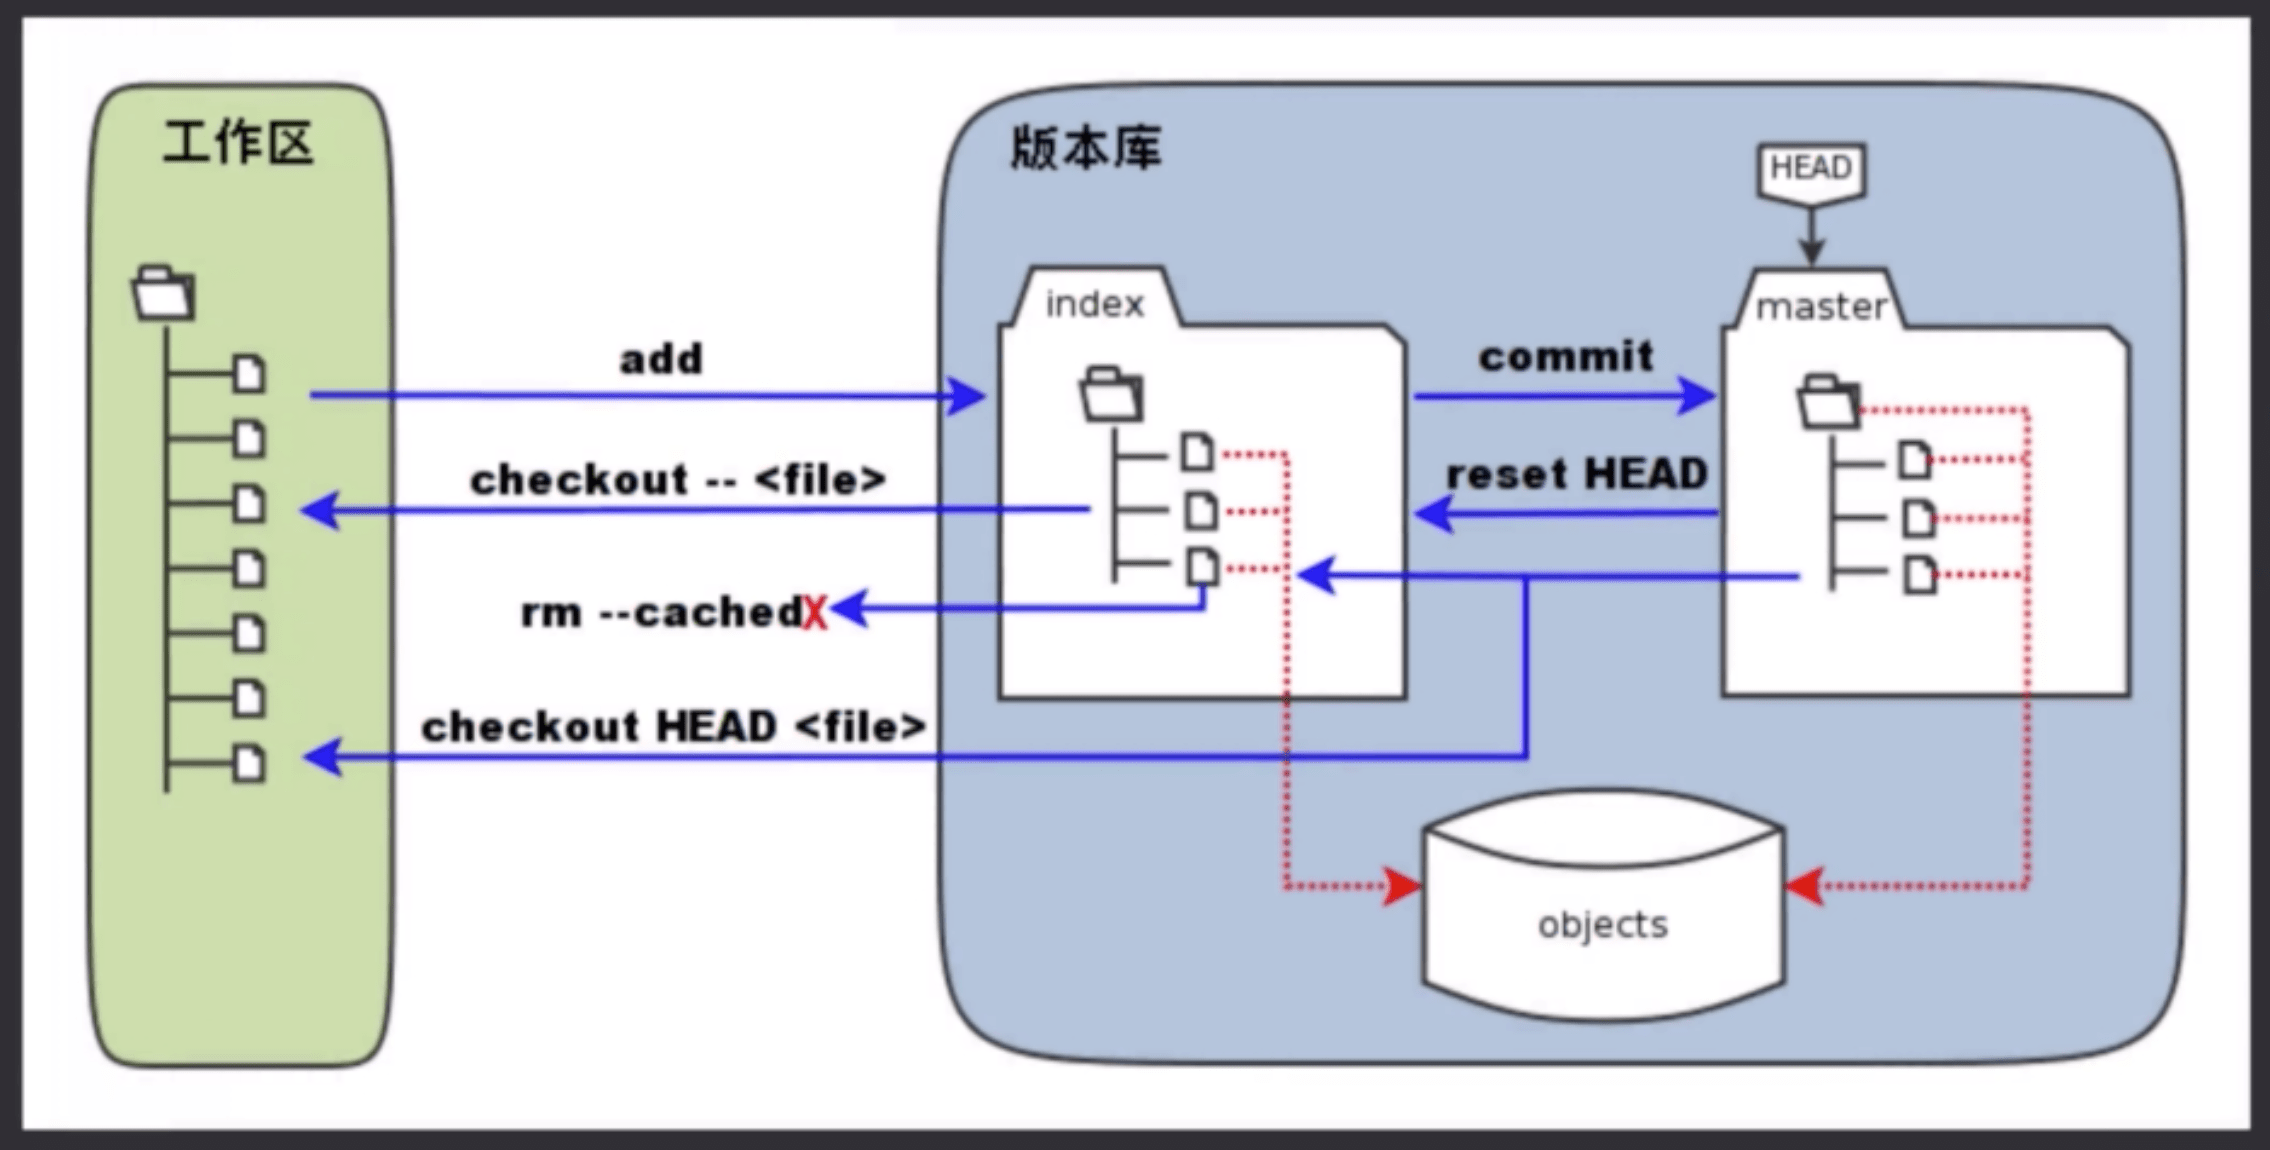
- Git 增删改查
参考来自 常用 Git 命令清单
$ cd learngit
$ git init  # 初始化Git仓库
** create readme.txt
** echo "line 1 ">> readme.txt

$ git add readme.txt            # 添加到暂存空间
$ git commit -m "first commit"  # 提交加备注信息
** echo "error line 2" >> readme.txt

$ git add readme.txt
$ git status  # 查看状态
** have a change.

$ git reset HEAD readme.txt  # 将暂存空间内容撤销
$ git checkout readme.txt    # 撤销工作空间内容
** echo "line2" >> readme.txt
$ git add readme.txt
$ git commit -m "commit line 2 "

$ git reset --hard HEAD^    # 回退为上个版本(删除修改)
$ git reset --hard (gitID)  # 回退为指定版本(删除修改)
$ git reset --soft (gitID)  # 回退为指定版本(不删除回退文件的修改)
$ git log                   # 查看当前版本及之前版本的id号
参考来自 learn-git-branching
# Git 仓库创建
$ git init                 # 将当前目录设为Git代码库
$ git init [project-name]  # 新建并将其设为Git代码库
$ git clone [url]          # 通过连接下载一个已有项目

# Git增加文件
$ git add [file1] [file2]  # 添加指定文件到暂存区
$ git add [dir]            # 添加指定目录到暂存区
$ git add .                # 添加当前所有文件到暂存区
$ git add -p               # 添加每个变化前都要求确认

# Git删除文件
$ git rm [file1] [file2]  # 删除工作区文件并且将这次删除放入暂存区
$ git rm --cached [file]  # 停止追踪指定文件但该文件会保留在工作区
$ git mv [file-original] [file-renamed]

# Git代码提交
$ git commit -m [message]             # 提交暂存区到仓库区
$ git commit -a                       # 提交工作区自上次commit之后的变化直接到仓库区
$ git commit -v                       # 提交时显示所有diff信息
$ git commit --amend -m [message]     # 使用一次新的commit替代上一次提交
$ git commit --amend [file1] [file2]  # 重做上一次commit并包括指定文件的新变化

# Git撤销操作
$ git checkout .                # 恢复暂存区的所有文件到工作区
$ git checkout [file]           # 恢复暂存区的指定文件到工作区
$ git checkout [commit] [file]  # 恢复某个commit的指定文件到暂存区和工作区

# Git重置操作
$ git reset [file]           # 重置暂存区的指定文件;与上一次commit保持一致但工作区不变
$ git reset --hard           # 重置暂存区与工作区文件;与上一次commit保持一致;谨慎使用
$ git reset [commit]         # 重置当前分支的指针为指定commit;同时重置暂存区但工作区不变
$ git reset --hard [commit]  # 重置当前分支的HEAD为指定commit,同时重置暂存区和工作区
$ git reset --keep [commit]  # 重置当前HEAD为指定commit,但保持暂存区和工作区不变

# 新建一个commit,用来撤销指定commit
# 后者的所有变化都将被前者抵消并且应用到当前分支
$ git revert [commit]
- Git 远程仓库
参考来自 常用 Git 命令清单
# 注册github.com并创建本机的ssh-key

$ ssh-keygen -t rsa -C "123456789@qq.com"

# 添加ssh-key到秘钥管理里面并关联远程仓库
$ git remote add origin git@github.com:xxx/learngit.git

# 如果远程仓库已经存在内容需要先pull下面,之后再提交
$ git pull origin master

# 将本地库push到远程仓库,第一次需要加u关联,之后可以不加
$ git push -u origin master

# 仓库克隆
$ git clone git@github.com:xxx/gitkills.git
参考来自 learn-git-branching
# Git远程分支推送
$ git fetch [remote]          # 下载远程仓库的所有变动
$ git pull [remote] [branch]  # 取回远程仓库的变化,并与本地分支合并
$ git push [remote] [branch]  # 上传本地指定分支到远程仓库
$ git push [remote] --force   # 强行推送当前分支到远程仓库,即使有冲突
$ git push [remote] --all     # 推送所有分支到远程仓库

# Git远程同分支查看
$ git remote -v                     # 显示所有远程仓库
$ git remote show [remote]          # 显示某个远程仓库的信息
$ git remote add [shortname] [url]  # 增加一个新的远程仓库并命名
- Git 分支管理
参考来自 常用 Git 命令清单
- 在工作区未提交的内容,所有分支都可以看到
- 提交之后的内容在对应的分支内,切换只能在对应的分支内看到
# 查看分支列表,其中*为当前分支
git branch

# 创建分支
git branch <name>

# 切换分支
git checkout <name>

# 创建并切换分支
git checkout -b <name>

# 合并某分支到当前分支
git merge <name>

# 删除分支
git branch -d <name>

# 强行删除分支
git branch -D <name>
参考来自 learn-git-branching
# Git查看分支
$ git branch     # 列出所有本地分支
$ git branch -r  # 列出所有远程分支
$ git branch -a  # 列出所有本地分支和远程分支

# Git分支切换
$ git branch [branch-name]     # 新建一个分支但停留在当前分支
$ git checkout -b [branch]     # 新建一个分支并切换到该分支
$ git checkout [branch-name]   # 切换到指定分支并更新工作区
$ git checkout -               # 切换到上一个分支
$ git branch -d [branch-name]  # 删除分支

# Git分支删除
$ git push origin --delete [branch-name]  # 删除远程分支
$ git branch -dr [remote/branch]          # 删除远程分支

# 建立追踪关系,在现有分支与指定的远程分支之间
$ git branch --set-upstream [branch] [remote-branch]
- Git 冲突处理
参考来自 常用 Git 命令清单
- 合并时显示分支冲突先
merge后修改<<<<分支1、<<<分支2之间的冲突内容,然后再提交。当前分支会比被合并的分支,多一次 commit 的提交记录。
# 合并指定分支到当前分支
# 禁用Fast forward功能,不删除分支且合并后保留分支
git merge --no-ff [branch]

# 选择一个commit并合并进当前分支
$ git cherry-pick [commit]
- Git 比对日志
参考来自 常用 Git 命令清单
# 查看分支情况
git log --graph --pretty=oneline --abbrev-commit
git log --graph --decorate --pretty=oneline --abbrev-commit --all
git log --pretty=fsormat:'%s %C(bold blue)(%an)%Creset' --abbrev-commit
git log --graph --pretty=format:'%Cred%h%Creset -%C(yellow)%d%Creset %s %Cgreen(%cr) %C(bold blue)<%an>%Creset' --abbrev-commit
参考来自 learn-git-branching
# Git日志格式

$ git log                        # 显示当前分支的版本历史
$ git log --stat                 # 显示commit历史及每次commit变更的文件
$ git log -5 --pretty --oneline  # 显示过去5次提交
$ git reflog                     # 显示当前分支的最近几次提交
$ git shortlog -sn               # 显示所有提交过的用户,按提交次数排序

# 显示某个commit之后的所有变动,每个commit占据一行
$ git log [tag] HEAD --pretty=format:%s

# 显示某个commit之后的所有变动,其"提交说明"必须符合搜索条件
$ git log [tag] HEAD --grep feature

# 显示某个文件的版本历史,包括文件改名
$ git log --follow [file]
$ git whatchanged [file]

# Git高级查询
$ git blame [file]                     # 显示指定文件是什么人在什么时间修改过
$ git log -p [file]                    # 显示指定文件相关的每一次diff
$ git log -S [keyword]                 # 根据关键词搜索提交历史
$ git diff --shortstat "@{0 day ago}"  # 显示今天你写了多少行代码

# Git 差异对比
$ git diff  # 显示暂存区和工作区的差异
$ git diff --cached [file]  # 显示暂存区和上一个commit的差异
$ git diff HEAD  # 显示工作区与当前分支最新commit之间的差异
$ git diff [first-branch]...[second-branch]  # 显示两次提交之间的差异

# Git显示内容
$ git show [commit]              # 显示某次提交的元数据和内容变化
$ git show --name-only [commit]  # 显示某次提交发生变化的文件
$ git show [commit]:[filename]   # 显示某次提交时某个文件的内容
- Git 内容存储
参考来自 常用 Git 命令清单
- 正在 dev 分支工作时,需要修改 bug 并提交。应该先把 dev 当前工作区 stash 储藏起来,修改完 bug 提交后在使用 git stash pop 恢复 dev 的内容到工作区。
# 储藏当前工作区
git stash

# 查看储藏区
git stash list

# 恢复指定内容到工作区,不在stash内删除
# 其中的stashid可以通过git stash list查询
git stash apply <stashid>

# 删除储藏区
git stash drop <stashid>

# 恢复stash的内容到工作区,并在stash内删除
git stash pop
- Git 标签管理
参考来自 常用 Git 命令清单
- 标签基本都是发布版本的时候使用的,所以平常很少使用,了解即可。
# 新建标签,默认为在HEAD上,也可以指定一个commit id号
git tag <name>

# 指定标签信息
git tag -a <tagname> -m "blablablabla"

# 使用PGP签名标签
git tag -s <tagname> -m "blablablabla"

# 查看所有标签
git tag

# 查看指定tag的详细内容
git show <tagname>

# 删除tag标签
git tag -d <tagname>

# 推送指定标签到远程
git push origin <tagname>

# 推送所有标签到远程
git push origin --tags

# 从远程删除标签
git push origin :refs/tags/<tagname>
- Git 配置管理
参考来自 常用 Git 命令清单
- 主要配置日常使用工具和提交记录相关的配置,需要注意的是,区分全局和本地配置。
# 列出配置项
$ git config --list
$ git config --global --list

# 获取配置项
$ git config user.name "escape"
$ git config --global user.name "escape"
$ git config user.email "escapelife@gmail.com"
$ git config --global user.email "escapelife@gmail.com"

# 添加配置项
$ git config -–add site.name yiibai
$ git config --global -–add site.name yiibai

# 删除配置项
$ git config -–unset site.name
$ git config --global -–unset site.name

# 获取帮助
$ git help <verb>
$ git help config

# 配置全局默认编辑器
$ git config --global core.editor vim
$ git config --global core.editor emacs

# 配置比较工具
$ git config --global merge.tool vimdiff

# 全局代理配置
$ git config --global https.proxy http://127.0.0.1:1080
$ git config --global https.proxy https://127.0.0.1:1080

# 全局取消代理配置
$ git config --global --unset http.proxy
$ git config --global --unset https.proxy
- Git 其他操作
参考来自 常用 Git 命令清单
# 生成发布压缩包
$ git archive
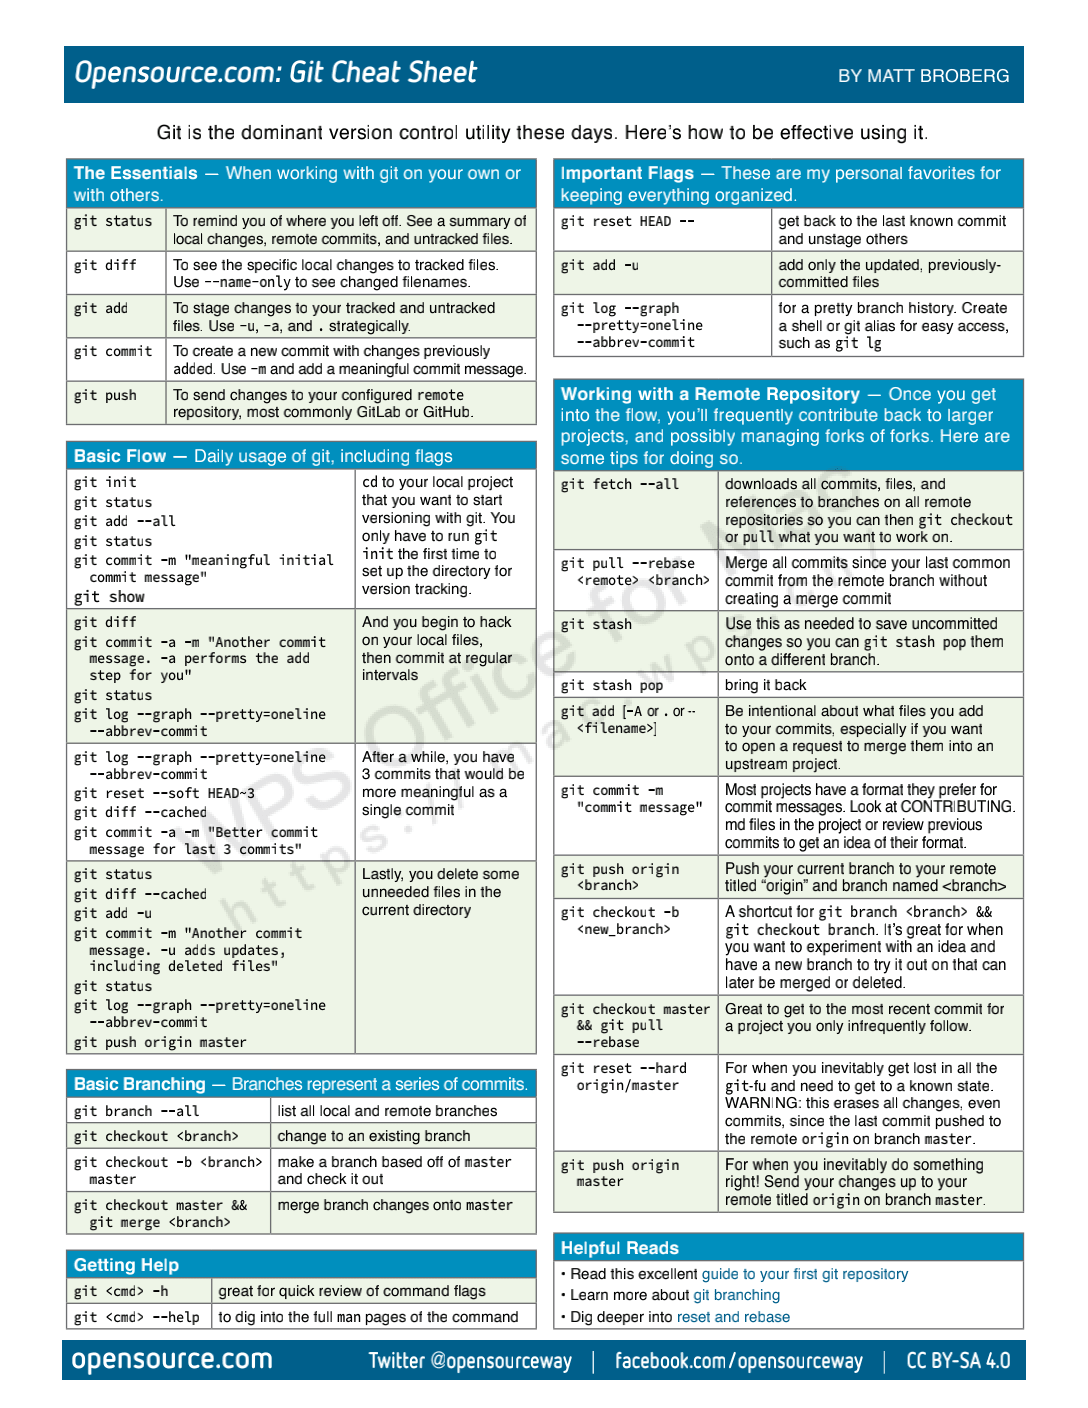
- 快捷键总结
OpenSource:总结的快捷键使用文档!
Git 常用命令实战
参考来自 Git 基础课
gitjk- 使用 git 初始化命令
git init - 新建一个文件,把它添加到 git 里边
echo "make git great" > a.txt && git add a.txt - 将文件移除暂存区
git reset HEAD -- a.txt - 查看 git 仓库
cd .git && ls -lacd objects && ls -la - 通过 git cat-file 命令查看文件内容
git cat-file -p 61ac375fc5565c8a763d942dc599fd34128bdb37 - 查看 index 暂存区
cd ../ && git ls-files --stage - 查看 HEAD 文件
cat HEAD提示:引用文件不存在,因为还没有 commit - 通过 commit 命令提交内容
git commit -m 'first version'提示:回过头来看 HEAD 的引用 - 通过 git status 查看本地文件修改和暂存区的情况
git status - 修改 b.txt
echo "b" > b.txt - 创建新分支
git branch name - 切换到某分支
git checkout branchgit branch dev && git checkout dev - 编辑 a.txt 添加 make dev great again
- 将 a.txt 通过 add 加入暂存区,再通过 commit 放入仓库
git add a.txt && git commit -m 'dev' - checkout 回 master,再创建一个 ops 分支
git checkout master && git branch ops && git checkout ops - 编辑 a.txt,添加 make ops great again
git add a.txt && git commit -m 'ops' - 开始合并分支 git merge
- checkout 回 master,然后运行 merge 命令
git checkout master && git merge dev - 带冲突的分支合并
- checkout 回 dev
git checkout dev - 修改 a.txt 将 make dev great again 从第一行换到最后一行
- 提交修改
git add a.txt && git commit -m 'update a.txt' - 再次合并
git checkout master && git merge dev && git merge ops - 合并失败后
- 放弃合并
git merge --abort - 手工合并冲突 打开 a.txt
- 再次提交
git add a.txt && git commit -m 'merged'
- 放弃合并
- 通过 git log 查看日志
git log - 通过 checkout sha1,可以回到历史
checkout -b 可以创建一个全新的分支 - 远程仓库
- gitlab 创建仓库
- git clone / git remote add
- git push
- 再改用 github
- git remote
- git remote show
<name> - git remote remove
<name> - git remote add origin url
- git push
- 储藏区
- 往 a.txt 写入字符串
echo "Good" > a.txt && git add a.txt && git commit -m 'init2'git stashgit stash applygit stash listgit stash listgit stash show / drop / clear
- 往 a.txt 写入字符串